Creating Stunning Depth with the Happy Birthday Cake Paper Cut Shadow Box
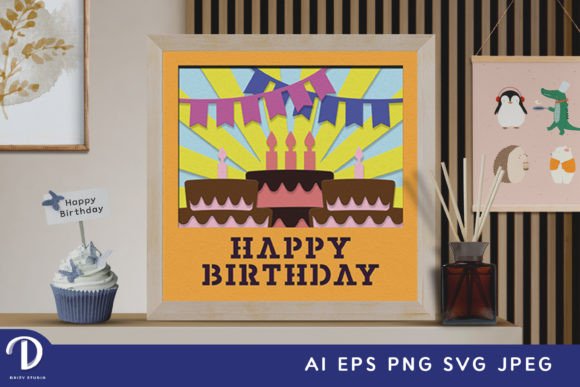
Crafting a memorable birthday gift often involves more than just wrapping a store-bought item; it requires a touch of personal effort and creativity that resonates with the recipient. For adults looking to elevate their gifting game or enhance their home decor with something unique, the Happy Birthday Cake Paper Cut template offers a perfect solution. This layered, square paper-cutting design transforms flat sheets of paper into a three-dimensional masterpiece, capturing the essence of celebration through depth and shadow. Whether you are an experienced crafter or someone looking for a manageable yet impressive DIY project, understanding how to utilize this template can lead to breathtaking results.
Understanding the Challenge of Unique Gifting
Finding a gift that feels both personal and professional is a common challenge. Store-bought cards often lack depth, while handmade projects can sometimes feel too amateurish if not executed with the right tools and guidance. The goal for many crafters is to create something that looks intricate and high-end without requiring years of artistic training. This is where the Happy Birthday Cake Paper Cut - Birthday Shadow Box bridges the gap. It provides a structured foundation—a pre-designed template—that ensures the final outcome is balanced and visually appealing, while still allowing the creator to inject their own style through material choices and assembly techniques.
The core need here is efficiency combined with quality. Adults often have limited time to dedicate to hobbies but still desire high-quality outcomes. A template that comes in multiple formats, such as AI, EPS, PNG, SVG, and JPEG, addresses this by offering flexibility. You do not need to start from scratch or worry about proportion errors; the design work is done for you, allowing you to focus on the tactile satisfaction of cutting, layering, and assembling.
How the Template Solves Creative Hurdles
The Happy Birthday Cake Paper Cut template is specifically engineered to solve the technical difficulties associated with paper layering. One of the most significant hurdles in creating shadow boxes is achieving consistent spacing and alignment across multiple layers. This template includes ten distinct layers, each precisely sized at 714 x 714 pixels for digital files and designed for a physical size of 20.32 x 20.32 cm. By providing these exact specifications, the template eliminates the guesswork involved in scaling and positioning.
Furthermore, the availability of the design in SVG format is a game-changer for those utilizing modern crafting technology. If you own a Silhouette, Cricut, or similar cutting machine, the SVG file allows for automated precision cutting. This ensures that even the most delicate details of the cake design are rendered perfectly every time. However, the template is equally accessible to traditionalists. If you do not have access to a cutting machine, the high-resolution JPEG and PNG previews serve as excellent guides for using an art knife and scissors. This dual approach ensures that the barrier to entry is low, regardless of your equipment.
Practical Applications and Assembly Strategies
Once you have your layers cut, the real magic begins during assembly. The primary application of the Happy Birthday Cake Paper Cut is as a framed wall decoration or a standalone shadow box. To achieve the best results, you will need glue or double-sided tape. The choice of adhesive can impact the final look; foam tape is often recommended for shadow boxes as it creates a consistent gap between layers, enhancing the 3D effect and allowing light to play across the contours of the design.
For those seeking an extra "wow" factor, converting this paper cut into a lightbox is a highly recommended option. By inserting LED strips between the layers, the translucent nature of the paper allows light to filter through, highlighting the intricate details of the cake and creating a warm, glowing ambiance. This transformation turns a simple paper craft into a functional piece of lighting decor, perfect for a child's room, a party backdrop, or a cozy living space accent.
It is important to note that while the digital previews give a clear idea of the design, the actual final product color may vary slightly depending on your choice of paper and lighting sources. This variability is actually a benefit, as it allows you to customize the color palette to match the recipient's favorite colors or the theme of the birthday party. You might choose pastel tones for a soft, elegant look or vibrant primaries for a festive, energetic vibe.
Tailoring the Project to Different User Needs
Different users will approach the Happy Birthday Cake Paper Cut project based on their specific goals and skill levels. For the busy professional looking for a quick but meaningful gift, the machine-cut route using the SVG file is ideal. They can cut all ten layers in minutes, assemble them during a lunch break, and have a polished gift ready within an hour. The ability to resize the SVG file while maintaining the aspect ratio means they can also adapt the design to fit specific frame sizes they may already have on hand.
Conversely, hobbyists who enjoy the meditative process of crafting may prefer the manual route. Using an art knife to carefully trace and cut the layers from the printed templates can be a relaxing activity. This approach allows for greater experimentation with textured papers, cardstocks of varying weights, or even hand-painted accents before assembly. These users often value the process as much as the product, finding satisfaction in the precision of their handiwork.
Teachers and community group leaders might also find this template useful for group activities. Because the design is standardized, it can be reproduced easily for multiple participants, making it a great candidate for workshop settings where everyone leaves with a finished piece. The clear instructions regarding layer count and sizing facilitate easy organization and distribution of materials.
Maximizing the Outcome
To ensure the best possible result, consider the weight of the paper you select. Heavier cardstock provides more rigidity and reduces warping over time, which is crucial for a piece that may be displayed for years. Additionally, when framing the finished Birthday Shadow Box, choose a deep-frame shadow box rather than a standard flat frame to accommodate the ten layers comfortably without crushing the design.
Remember that the images provided in the product listing are for preview purposes. The true potential of the Happy Birthday Cake Paper Cut lies in your execution. Whether you are making it as a heartfelt gift for a friend, a family member, or someone special, the layered depth of this design conveys a level of thoughtfulness that flat gifts simply cannot match. By leveraging the provided formats and following practical assembly tips, you can create a stunning visual tribute that celebrates the occasion with style and substance.
Ultimately, this template is more than just a file download; it is a resource that empowers you to create professional-grade decor with ease. It addresses the need for uniqueness, solves the problem of technical complexity, and offers versatile applications ranging from wall art to illuminated displays. With the right materials and a bit of creativity, the Happy Birthday Cake Paper Cut becomes a cherished keepsake that brings joy long after the candles have been blown out.